Authentication
To access the API dedicated to the Registrars, you must authenticate and obtain an access token using the OAuth2 protocol (RFC6749).
Info
All the following examples refer to the production authentication server auth.nic.it. For the test environment (pubtest), use the auth.pubtest.nic.it server with the exact same configuration.
The OAUTH2 protocol provides several authentication methods (grant_type) to obtain an access token, which depend on the type of application to be developed. The following documentation refers to the authentication of an application that needs to use the .it Registry APIs in a server-to-server mode, without the direct interaction of a user who authenticates himself. In these cases, it is planned to use the authentication method called client credentials, according to which the client (in our case, a client linked to a Registrar) authenticates itself and obtains the access token.
For security reasons, the Registry authenticates Registrar clients not through credentials (client id and client secret), but using an authentication mechanism based on sending a signed JWT (JSON Web Signature JWS - RFC7515 and JSON Web Token JWT - RFC75919). The ability to authenticate clients with mechanisms other than credentials has been defined by RFC7521 and RFC7523.
Create a client
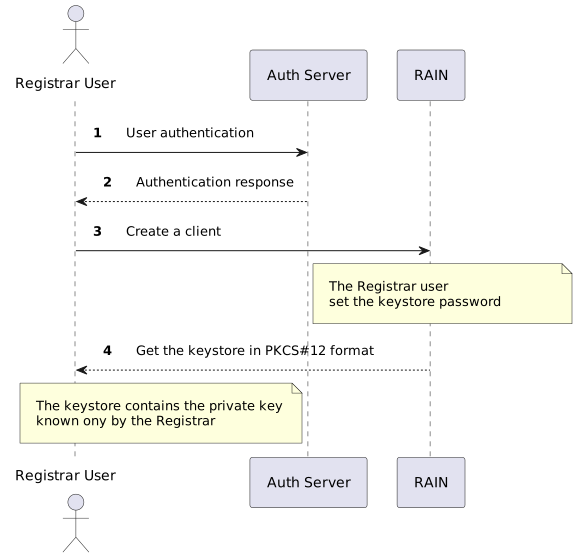
The first step is to create a client. This operation is performed by a Registrar user with the admin role, through Clients Management in the Security menu available on the RAIN portal. Once the client has been created, the user can download a Keystore in PKCS#12 format, which will contain the private key to be used to sign the JWT. The Keystore will be protected by a password chosen by the user when creating the client.
Client creation can only be performed through the RAIN portal and must be carried out by a user in the Registrar admin group. When creating a client, the following information must be specified:
- The user to associate with the client, which can be different from the user creating it
- The groups to associate with the client. The available groups are based on the user’s client-associated groups. The groups determine which operations can be performed with the client
- An expiration date for the client, after which it can no longer be used. The current maximum duration is 1 year
After the client has been created, only the user associated with the client can generate the Keystore through the RAIN portal.
The following diagram summarizes the steps involved in client creation:
Info
It is important to note that the Registry does not store either the generated Keystore or the password chosen by the Registrar to protect it. If the password or Keystore is lost, the client must be removed and recreated.
Authenticate with signed JWT
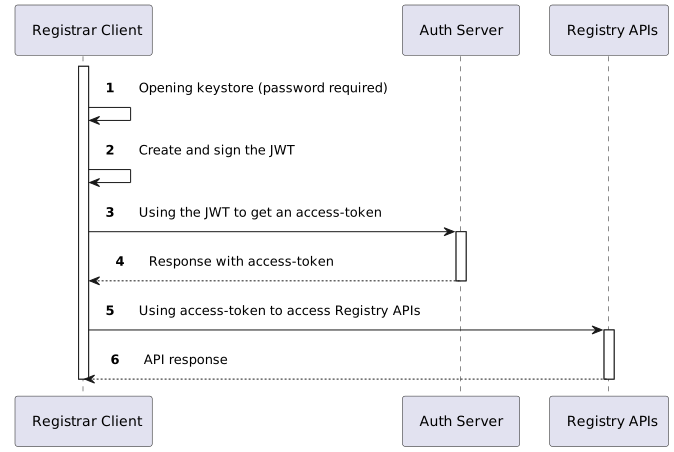
Once the client has been created and the Keystore obtained, the Registrar will be able to authenticate and get the access token that will allow it to access the Registry APIs.
The steps required for authentication are described in the following diagram:
Create a JWT
A JWT can be created either manually or using various libraries, generally available in all programming languages, which simplify its creation.
The JWT to be created will look similar to the one shown below:
{
    "iss": "7b81d500-62cc-11ed-9b6a-0242ac120002",
    "jti": "8759f4ed-7fbd-40f7-a1ae-1bff576e61ca",
    "sub": "7b81d500-62cc-11ed-9b6a-0242ac120002",
    "aud": [
      "https://auth.nic.it/auth/realms/registrar"
    ],
    "iat": 1739440419,
    "exp": 1739440719
}
The fields in the JWT must be filled in according to the following rules:
- iss (issuer) and sub (subject) must contain the client identifier (client_id), which will be generated by the Registry when the client is created
- jti (JWT ID) is a unique identifier that must be different for each authentication request. Authentication cannot be performed more than once with the same value in the jti field (otherwise, a response with HTTP code 400 BadRequest will be returned). In the example, the jti field has been set to a UUID (Universally Unique IDentifiers - RFC9562)
- aud (audience) must contain the URL of the authentication server (https://auth.nic.it/auth/realms/registrar)
- exp (expiration time), the generated JWT cannot be used for authentication after the expiration time specified in this field (typically, a duration of few seconds or minutes should be set)
- iat (issued at) is the only optional field and is used to indicate when the JWT was issued
Signing a JWT
Once the JWT has been created with the appropriate values, it must be signed.
The signing operation requires the private key to be extracted from the Keystore and then proceed to sign the JWT with the key obtained. PKCS#12 Keystore management and JWT signing are typically performed using standard libraries or tools available in all programming languages.
Authentication
Once the signed JWT has been created, the Registrar can send it to the Registry's authentication server and get the access token needed to access the Registry APIs.
The following is an example of an authentication request to get an access token (RFC7523):
POST /auth/realms/registrar/protocol/openid-connect/token HTTP/1.1
Accept-Encoding: gzip, deflate
Accept: */*
Connection: keep-alive
Content-Length: 849
Content-Type: application/x-www-form-urlencoded; charset=utf-8
Host: auth.nic.it

grant_type=client_credentials&client_id=7b81d500-62cc-11ed-9b6a-0242ac120002&client_assertion_type=urn%3Aietf%3Aparams%3Aoauth%3Aclient-assertion-type%3Ajwt-bearer&client_assertion=yJhbGciOiJSUzI1NiJ9.......re5DtY9JJLM_w
curl -X POST https://auth.nic.it/auth/realms/registrar/protocol/openid-connect/token \
-H "Content-Type: application/x-www-form-urlencoded" \
-d 'grant_type=client_credentials&client_id=7b81d500-62cc-11ed-9b6a-0242ac120002&client_assertion_type=urn%3Aietf%3Aparams%3Aoauth%3Aclient-assertion-type%3Ajwt-bearer&client_assertion=yJhbGciOiJSUzI1NiJ9.......re5DtY9JJLM_w'
http --form POST https://auth.nic.it/auth/realms/registrar/protocol/openid-connect/token \
grant_type=client_credentials \
client_id=7b81d500-62cc-11ed-9b6a-0242ac120002 \
client_assertion_type=urn:ietf:params:oauth:client-assertion-type:jwt-bearer \
client_assertion=eyJhbGciOiJSUzI1NiJ9.......re5DtY9JJLM_w
Info
In the example above, no scope has been specified. For more information, see the section dedicated to scope.
The response to the request for an access token will be a JSON like the following:
{
  "access_token": "eyJhbGciOiJSUzI1NiI....vqnLkImYB-g7HO5yiOtHVFAlaCw",
  "expires_in": 300,
  "refresh_expires_in": 0,
  "token_type": "Bearer",
  "not-before-policy": 0,
  "scope": "registrar"
}
The access_token field contains the access token that must be used in requests to the Registry APIs, as in the following example:
Info
The access token has a lifetime, expressed in seconds, specified in the expires_in field (in the example, the duration is 300 seconds). Upon expiration, a new access token must be requested by repeating the steps described above.
Groups
When creating a client, you can specify one or more groups to which the client belongs. Groups limit the operations that can be performed by the client.
The groups currently used by the APIs are as follows:
- admin: allows access to all features offered by the API
- domain: allows access to features related to domains and contacts
- billing: allows access to features related to payments, invoices, credit, etc.
- darwin: allows access to features related to Darwin for users who are not already in the admin or domain group
The documentation for each API feature indicates which group is required to use it.
Scope
The scope, defined in RFC6749, allows you to specify the "purpose" of the access request, that is, to indicate or limit the intended use of the obtained access token.
Tip
Using the scope during authentication is important both to limit the features that can be accessed with the obtained access token and to determine the information (claim) it contains.
For security reasons, it is recommended to limit scopes to only those that are strictly required.
The documentation of each feature offered by the APIs will indicate which scope must be present in the token to use that functionality.
For example (but not limited to), here are some of the specific values of scope that have been created for access to the .it Registry APIs:
- domain
- security
- darwin
- billing
- registrar
Note
Some values in the scope, such as registrar, are added by default without needing to be requested
There are additional values of scope, not defined by the Registry, that are added automatically or optionally.
Below is an example on how to require a specific scope to be present in the token:
POST /auth/realms/registrar/protocol/openid-connect/token HTTP/1.1
Content-Type: application/x-www-form-urlencoded; charset=utf-8
Host: auth.nic.it

scope=domain%20security&grant_type=client_credentials&client_id=7b81d500-62cc-11ed-9b6a-0242ac120002&client_assertion_type=urn%3Aietf%3Aparams%3Aoauth%3Aclient-assertion-type%3Ajwt-bearer&client_assertion=yJhbGciOiJSUzI1NiJ9.......re5DtY9JJLM_w
curl -X POST \
     -H 'Content-Type: application/x-www-form-urlencoded' \
     -d "scope=domain%20security&grant_type=client_credentials&client_id=7b81d500-62cc-11ed-9b6a-0242ac120002&client_assertion_type=urn%3Aietf%3Aparams%3Aoauth%3Aclient-assertion-type%3Ajwt-bearer&client_assertion=yJhbGciOiJSUzI1NiJ9.......re5DtY9JJLM_w" \
     https://auth.nic.it/auth/realms/registrar/protocol/openid-connect/token
In the above example, the scope domain and security have been requested, so you can use features (APIs) that require these values.
Example scripts
To simplify the integration, example scripts are available in the three supported modes:
- POSIX shell
- Python
- Node.js
The archive is distributed together with the documentation and can be downloaded directly here: example-scripts.tar.gz.
After extracting the archive, you will find the scripts/ directory with the following structure:
scripts/shell/get-access-token.shscripts/python/get-access-token.pyscripts/python/requirements.txtscripts/nodejs/get-access-token.jsscripts/nodejs/package.json
All scripts accept the same main parameters:
--profile prod|pubtest--keystore /path/to/client.p12--password <keystore-password>--client-id <client-id>--scope 'domain security'optional--ttl 300optional--raw-tokenoptional, prints only theaccess_tokenvalue
Shell usage
Prerequisites:
curlopenssluuidgen
Example:
chmod +x ./scripts/shell/get-access-token.sh
./scripts/shell/get-access-token.sh \
  --profile prod \
  --keystore ./client.p12 \
  --password 'secret' \
  --client-id regczyv18nrlqbze6bahw2y1bm5fuhdo3puyksod
Python usage
Prerequisites:
python3- dependencies installed from
scripts/python/requirements.txt
Dependency installation and example:
python3 -m pip install -r ./scripts/python/requirements.txt
python3 ./scripts/python/get-access-token.py \
  --profile prod \
  --keystore ./client.p12 \
  --password 'secret' \
  --client-id regczyv18nrlqbze6bahw2y1bm5fuhdo3puyksod
Node.js usage
Prerequisites:
node- dependencies installed in the
scripts/nodejsdirectory
Dependency installation and example:
npm install --prefix ./scripts/nodejs
node ./scripts/nodejs/get-access-token.js \
  --profile prod \
  --keystore ./client.p12 \
  --password 'secret' \
  --client-id regczyv18nrlqbze6bahw2y1bm5fuhdo3puyksod
To use the test environment, replace --profile prod with --profile pubtest. If you only need the token to reuse it in other scripts or pipelines, add the --raw-token option.